Advertisement
Home Page
Funroom Info Store
Free Stuf
Toys & Gifts Recipes Games


Cold Water Tie Dye

You Need:
  • Cold Water Dye 3 pkgs - all different colors (available at craft/fabric stores)
  • Water
  • 3/4 cup Salt
  • T-Shirts 100% cotton (we made 3 adult and 2 children sized shirts)
  • Rubber gloves
  • Plastic bags (ziploc-type or other totally sealable)
  • Large Rubber bands
  • Bottles with squirt-type top (we used squeeze-type old plastic mustard bottles)
  • Old craft-bowls or buckets (one large one medium)
  • Funnel
  • Lots of newspapers, paper towels, old trays or pans to work on


Cold water tie dye brings a classic craft back with a much safer and easier method.


 PREPARATION :

*Be sure to review and follow manufacturer's precautions and first aid directions when using Cold Water Dyes.

Make sure to use only 100% cotton shirts with no finishes (ie. scotchguard). Mixed blend shirts will still pick up the dye, but not quite as well.

First prepare your T-shirts by washing them (if they're new) and leaving damp. If it's not possible to leave the shirt damp after washing, just dampen the shirts before you begin. Remember we want the shirts damp not soaking wet. So be sure to wring shirts out.

Then assemble your work area. Lay plenty of newspaper out on worksurface. This craft can get extremely messy and very staining so be careful. We recommend to do the actual dying of the shirts in some sort of old tray due to the amount of dye coming off the shirt during preparation. Also keep plenty of paper towels on hand. We highly recommend using rubber gloves during this project while handling the fixer, dyes, and saturated shirts. And also recommend the use of old clothes-just in case

Prepare Dye Colors:

In old medium bowl or pitcher-type container mix 1-1/2 cups of warm water with package of first color of dye mix. Stir till dissolved. Using a funnel carefully pour dye into prelabeled bottle with squirt-type tops Any extra dye store to side in a sealed container. Repeat with remaining two colors, placing them each in their own prelabeled bottles.

Prepare Fixer:

In old large bowl or bucket pour 6 cups hot water, 3/4 cup of salt and 3 packages of Cold Dye Fix from the Cold Water Dye packages. Stir to dissolve.
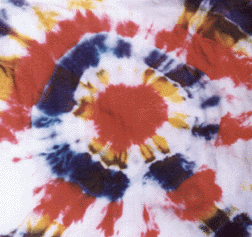
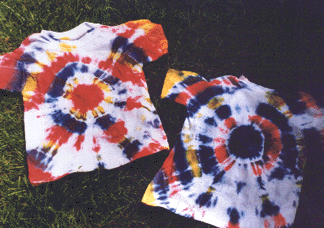
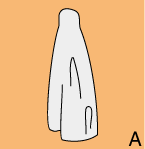
TYING SHIRT:

Make sure to start with a damp shirt. Lay shirt flat and gently grab center of shirt pulling up and holding shirt by center point. With other hand smooth shirt down into a snake-like shape (see illustration A).


Wrap first rubberband anywhere from 2-3" from top. To do this wrap band around shirt, then twist, then wrap again, twist again etc (like making a pony tail). Continue wrapping rubberbands on shirt at intervals of anywhere from 2-3" apart and as tight as possible without breaking along entire length of shirts. (illus. B)


BEGINNING THE DYE PROCESS:

Wearing rubber gloves, soak shirts in fixer solution for a five minutes. Squeeze shirt gently so that it is damp but not soaking wet. Lay shirt in preparation tray. Begin applying colors as desired. You may want to begin by just turning the bottle over to sort of drip on the shirt until you gauge how fast your color is coming out of the bottle. The placement of the color is up to you. Little streaks of color here and there or make the gap between each rubber band a different color; which is what we did (illus. C). Turn shirt over to color bottom side too.

Make sure shirt is totally saturated with the colors because its hard to get the colors deep down in the shirt. You may want to press tip of bottle deep into shirt to saturate center of shirt. A lot of dye will end up in the pan, but that's to be expected.

When your finished with your design. Place shirt in a plastic bag and seal completely. Let set 24 hours.

FINISHING:

After 24 hours, remove from bag (while again wearing gloves). Rinse, undo ties and rinse again. Soak in pan of hot soapy water 10 minutes. Rinse again till water runs clear and lay flat to dry. The first time you wash the shirts, wash them separately from other laundry with a cup of white vinegar in the load.

Enjoy your wearable art!

You can have more or less colors than we used in our project. For two colors reduce the hot water mixed with the fixer to 6 cups and the salt to 1/2 cup and 2 pkgs of cold dye fix. To have more than 3 colors you may not need to adjust the amounts depending on how many T-Shirts you are dying. If you are doing quite a few shirts and there is not enough fixer solution, add 3 cups of water and 1/4 cup salt and one package cold dye fix per color added.


 Other Summer Fun Free Stuff

| Make some Yarn Art | Make a Fruit Bowl | Make some Juice Pop | Macrame` a Bracelet |
| Make a Sand Painting | Tie-Dye a T-Shirt | Bake a Watermelon Cake | Make a Wave Maker |


funroom.comThe place you go for fun!