 |
Macrame` Bracelets
- You Need:
- Scraps of yarn
- Straight pins
- Piece of foam core approx. 8" x 14" (or corrugated cardboard)
- Scissors
|
This project is quick, easy and inexpensive. Extra care should be used when working with pins. This is not a project for small children.
PREPARATION of Twisted Knot Bracelet (red and yellow):
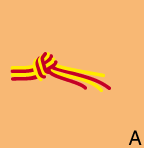
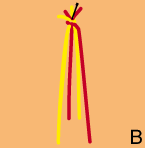
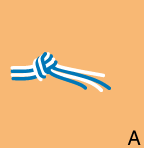
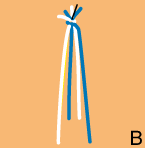
First select two colors for bracelet. Cut one 22" piece and one 36" piece of each color. (You should wind up with four strings; two long, two short) For our example we used red and yellow. Lay your strings with ends matching and colors separated. (yellow, red, yellow, red) The two longest strings should be on the outsides and the two shorter strings in the center. At the end that all the strings match up evenly, tie all four strings into one big knot (much like tying a balloon.) See illustration A. Using a straight pin, pin the strings by the knot to the end of the foam core (B).
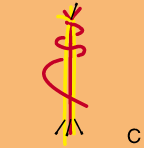
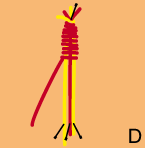
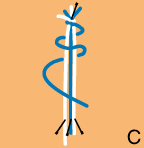
Then select one of the longest strings on the outside and pull a little to the side to separate it (we chose the longest red string). Take the remaining three strings pulling them gently down to make taut but not extremely tight and secure each string with its own pin to the board. Then take the string you pulled of to the side and beginning winding it gently around the other three strings. (C & D) As you wind you want it to cover the strings underneath if the strings underneath are showing through you can push the already wound string up and closer to each other to close the gaps. Don't wind too tight or too loose. Keep winding until the total length of the wound up area is about 1-1/4".
Again, pull the long string you were winding off to the side and unpin the other three. The two longest strings should again be on the outside and the shorter ones in the middle. Take the shorter strings in the center and again pull them gently down to make taut but not extremely tight and secure each string with its own pin to the board.
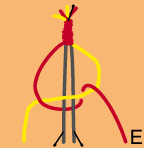
You may have to tighten up the end of the string that we wound around the end of the bracelet before making your first knot. To begin your first knot take the long string to the outside right (ours is yellow) and cross it over the center strings (E) take the other long string (ours is red) bring it over the yellow string and behind the two pinned strings and up through the yellow string again (basically tying a knot). Keep continuing with this same exact knot over and over again. As you go along the bracelet will begin to twist and you might want to let it twist fully around when it does this to make knotting easier. Keep tying knots until the total length of just the knotted area is about 7".
At this point select the same string that you originally did the winding at the top of the bracelet with and lay to the side. Select the other three strings pulling them gently down to make taut but not extremely tight and secure each string with its own pin to the board. Again wrap the string around the bracelet as you did at the top for a length of about 1-1/3". Unpin strings, being sure not to let the string you just wrapped unwind and make a knot like you did to start of the bracelet with. Take the pin out that is holding the top af the bracelet and trim both ends to about 1/8" to 1/4" from knot.
Wear it yourself or give to a friend.
PREPARATION of Square Knot Bracelet (blue and white):
First select two colors for bracelet. Cut one 22" piece and one 36" piece of each color. (You should wind up with four strings; two long, two short) For our example we used blue and white. Lay your strings with ends matching and colors separated. (white, blue, white, blue) The two longest strings should be on the outsides and the two shorter strings in the center. At the end that all the strings match up evenly, tie all four strings into one big knot (much like tying a balloon.) See illustration A. Using a straight pin, pin the strings by the knot to the end of the foam core (B).
Then select one of the longest strings on the outside and pull a little to the side to separate it (we chose the longest red string). Take the remaining three strings pulling them gently down to make taut but not extremely tight and secure each string with its own pin to the board. Then take the string you pulled of to the side and beginning winding it gently around the other three strings. (C & D) As you wind you want it to cover the strings underneath if the strings underneath are showing through you can push the already wound string up and closer to each other to close the gaps. Don't wind too tight or too loose. Keep winding until the total length of the wound up area is about 1-1/4".
 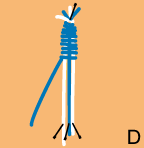
Again, pull the long string you were winding off to the side and unpin the other three. The two longest strings should again be on the outside and the shorter ones in the middle. Take the shorter strings in the center and again pull them gently down to make taut but not extremely tight and secure each string with its own pin to the board.
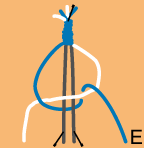 
You may have to tighten up the end of the string that we wound around the end of the bracelet before making your first knot. To begin your first knot take the long string to the outside right (ours is white) and cross it over the center strings (E) take the other long string (ours is blue) bring it over the white string and behind the two pinned strings and up through the white string again (basically tying a knot).
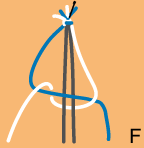
Then, take the string to the left and cross it over the pinned strings. Take the other long string to the right and bring it over the first string, behind the pinned strings and out through the first string (F). Once both knots are completed you have made a square knot. Continue making one knot (E) and then the other (F) until the total length of just the knotted area is about 7".
At this point select the same string that you originally did the winding at the top of the bracelet with and lay to the side. Select the other three strings pulling them gently down to make taut but not extremely tight and secure each string with its own pin to the board. Again wrap the string around the bracelet as you did at the top for a length of about 1-1/3". Unpin strings, being sure not to let the string you just wrapped unwind and make a knot like you did to start of the bracelet with. Take the pin out that is holding the top af the bracelet and trim both ends to about 1/8" to 1/4" from knot.
Wear it yourself or give to a friend.
Other Summer Fun Free Stuff

|
|
|


